With this blog, we will drive the simple and easy steps to setup Roku with all the Roku setup instructions. Let’s start.
Roku is a media streamer that is known for manufacturing hardware digital media players, and TVs running the company’s namesake platform. They provide access to streaming media content from online services. With the Roku device, anyone can watch online content from Apple Tv, Youtube, Amazon Prime, Hulu, and more than 40,000 other free and paid channels. They also tend to make wonderful gifts. Whether you receive a Streaming Stick, Roku Express 4K plus, Roku TV, or an Ultra box, get ready to use it. But before you start to use and watch all the content, you have to set up Roku first. If you don’t know how to setup Roku, go through this blog.
How to Setup Roku TV in Easy Way
To set up the Roku device generally depends upon which model are you using. Any differences are commonly related to your plug-in method (Some player devices connect to the TV using an HDMI cable).
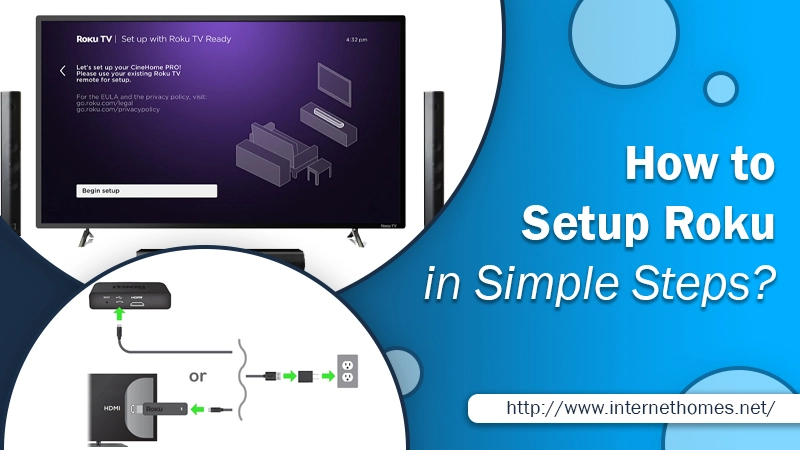
Step1: Connect Roku Device to TV
Connect your Roku device to your TVs using an HDMI (High-Definition Multimedia Interface) cable. If you have a Streaming stick box, you don’t need an HDMI cable. You can directly insert the Streaming Stick into the HDMI port.
Note: To watch 4K content on the TV, you need a Roku player which supports 4K as well as plug it into an HDMI port that supports HDCP 2.2.
Now, plug its power cord in a Roku device, depending on which TV model you have. This power plug can be a micro-USB connector or a small round connector. Plug the further end of the power cord into the TV’s USB port or the included AC adapter. After that, plug it into an electrical outlet.
Ensure that Tv is turned on and enter the correct information for the Roku player. After the boot, you see the Roku’s welcome screen.
Note: If your TV doesn’t have any HDMI port, you require a Roku device that supports composite video. This feature is not available on current Roku models, but older models like Roku Express plus have. So for a new Roku setup, you have a new TV with which Roku configures.
After the first step of how to set up a Roku tv, now head towards the next step.
Step2: Pair Your Roku Remote
Open the remote battery cover and insert the batteries.
Assuming you have an improved remote, you’ll have to match the remote control with the player – in the event that you do; you see a message on the screen notifying you to press the reset button on the remote (it’s situated in the battery compartment) for 3-5 seconds. If your Roku incorporates a straightforward remote, it won’t be matched.
Now, you are capable of controlling the Roku with the remote. If you have a simple remote, always point it to the Roku player while using it.
Note: You can use Roku with a mobile app from iPhone or Android instead of a remote. While pairing the remote, you have to follow Roku setup instructions which help you.
Pairing the remote was another step of the procedure “how to setup Roku”. Lets’ proceed to the next one.
Step3: On-Screen Setup and Connect to Wi-Fi
The next step in how to connect the Roku stick to the tv is after the Roku screen displays on the TV (by default, it’s on the language settings screen) and the remote working is appropriate.
- Follow the instruction on the screen to set up Roku. Press the five-way control button to drag around the screen on the remote. Press OK to make the choices and change screens.
- Begin selecting the language and then your home WiFis and enter the password. Always use the fastest band available; like using a dual-band router, select the 5GHz band, which provides a much smoother and faster video streaming.
- Continue with the how-to setup Roku instructions. Roku will download updates once it connects to Wi-Fi.
- You have to help the Roku in choosing the best settings for your TV. Let the Roku autodetect the TV format, or you can also choose the settings manually.
- Most Roku models have a voice remote that controls your TV volume controls and the power. The Roku setup should now configure the remote. Follow the on-screen instructions to help the Roku remote use the TV remote settings.
- After connecting to the Wi-Fi, let’s know the ending step of how to connect the Roku stick to the TV.
Step4: Activate Your Roku Device
In this final process of setting up Roku, you have to activate your Roku plate.
Follow the on-screen Roku setup instructions to enter an email address with the new Roku account. You need a Roku account (it’s absolutely free) to activate the device. If you already have a Roku account of a previous Roku device, you can operate the email address.
In some time, you’ll get an activation email. Click on the link from the email, which takes you to Roku’s website after the activation. To complete the procedure, log in with a new account or existing Roku account.
You can now finish the setup on Roku’s website, which includes choosing the stream channels you want to use. After setting up Roku, you can choose and log into your favorite channels like HBO, Discovery, Netflix, etc. In the future, you can also add more channels from the Roku player channel store.
Read Also- How To Turn Off The Roku Streaming Device?
Summing Up
That’s it. It is the whole procedure of How to Setup Roku Stick to TV. If you want to have more control, download the Roku app on your Android or iOs device, making your phone work as a Roku remote. Also, you can add Roku skills to your Alexa app or Google Assistant for voice control. Roku also profers some instructional videos that help you know more about your device. Also, check your privacy settings.