Gmail comes up as a true champ due to its clean interface and other superb features. What’s more exciting is with simple Gmail SMTP settings you can start sending emails from other email clients like Outlook or Thunderbird via Gmail.
Moreover, if you are looking for a bulk emailing server for your WordPress site, then also Gmail’s SMTP server appears as a clear winner. It allows you to send up to 500 emails a day for free! With that being said, Gmail’s dedicated email sending service can work out for a majority of WordPress sites.
But what Gmail SMTP server settings you need to perform? Just stick on this blog for another 5 minutes and you will get it to learn all the tips and tricks. Even if you have a different operating system, the steps in this blog will help you send an email without spending a penny.
What Gmail SMTP Settings are required to Start Sending Emails?
Whether you are trying to send email through Outlook, Thunderbird, or from a WordPress website, the following SMTP Gmail settings come in handy. Here is the first step towards beginning to send an email for free!
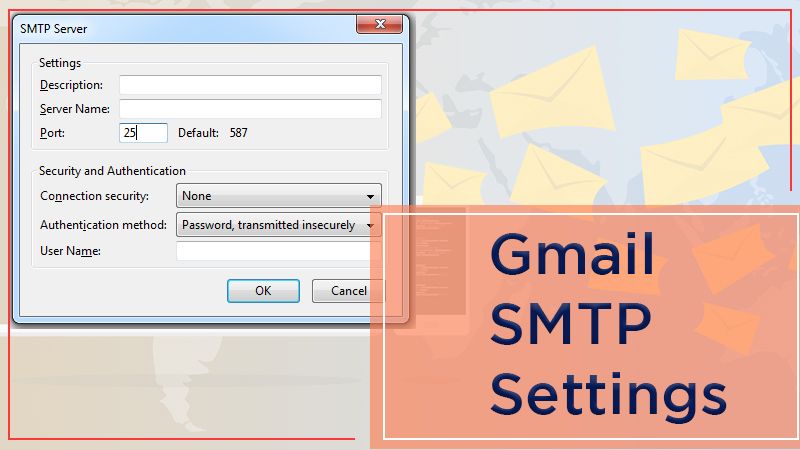
Gmail SMTP server address – smtp.gmail.com
Gmail SMTP username – Your complete Gmail address
Gmail SMTP password – Your Gmail account password.
Gmail SMTP port – 587 (TLS).
Gmail SMTP port – 465 (SSL).
Gmail SMTP TLS/SSL required – Yes.
Requires authentication – Yes.
Requires secure connection – Yes.
How Do I Setup WordPress With Gmail SMTP Settings?
WordPress site is facing trouble sending emails? Or you don’t want to pay for costly email servers for WordPress? Above SMTP settings for Gmail can work as a savior and stress you out without incurring any extra cost. These instructions work really well and require a one-time setup. Follow the steps in the given order to hassle-free configure your WordPress with SMTP Gmail settings.
Step 1. Activate Post SMTP Mailer/Email Log
Getting started with configuring WordPress for Gmail SMTP settings, you should install and activate the post SMTP mailer or email log plugin. It can be found available on WordPress. Once configured, you can start sending emails through the Gmail SMTP server. Here are the steps that you need to follow afterward.
- Navigate to the WordPress dashboard, go to the Start the Wizard section.
- Click Show All Settings.
- Click the Message tab and type the From email and name.
- Enter your Gmail address under the Fromtab or you can also use the preferred email ID.
- Now click the Account tab, choose Gmail API in the drop-down list.
- You will see the Authorized JavaScript origins and Authorized redirect URI tabs, take a note of them, or keep them open to be used in the next section.
Step 2. Develop your Google App Project
The next step is to personalize and develop the Google App. It will help you to send emails through the Gmail SMTP server. Here is what you need to do.
- Open a New tab and navigate to the Google developer console.
- For the first time, you need to create a new project by following the instructions on the Google developer console.
- However, if you already have made some projects then you can straightaway navigate to the existing file.
- Once you’re done with creating a project, click Enable APIs and services.
- Click the Search bar, type Gmail, and select Gmail API.
- Click the Enable button.
- Now a dedicated Gmail API interface will appear.
- Click Create Credentials button.
- Under Find out what credentials you need, choose the following options.
- Which API are you using – Gmail API.
- Where will you be calling the API form – Web Browser.
- What data will you be accessing – User data.
- In the end, click the button What credentials do I need.
Step 3. Create and Setup a Consent Screen
After creating your Google app, you will be prompted to set up a consent screen. Follow the below steps.
- Click the Setup consent screen.
- A new window opens, click the OAuth consent screen.
- Go to the User type category, click External and click Create.
- Enter your personal details on the next window.
- Click Save.
Step 4. Add credentials to your Google app project
- Go back to the Add credentials to your project tab.
- Enter your website name under the Name column.
- Fill up their relevant details under Authorised JavaScript origins.
- Enter the desired information under Authorised redirect URIs.
- Click Refresh and this button will switch to Create OAuth client ID.
- Finally, click Done.
- Open the Credentials tab and go to the section OAuth 2.0 client IDs.
- Click on the newly created entry.
- Note down two things – client ID and client secret.
Step 5. Merge Gmail client ID with Post SMTP mailer
- Navigate back to the WordPress dashboard and go to Post SMTP mail/email log settings.
- Simply paste the details under the client ID and client secret section that you have copied previously.
- Click save changes.
- Click the link Grant permission with Google.
- A new window will open saying “This app isn’t verified”, here click Show advanced settings and then click Go to yourwebsite.com.
- Ensure to select the Allow button to permit the WordPress website to access your Gmail account.
- That way you will be using Gmail SMTP settings to send email via the SMTP server.
Finally, you can simply send a test email and the feature is included under the Post SMTP setup window. Further, enter the email address that you want to send an email to, once delivery is successful, you will see the status as Success.
Also Read: Google Account Recovery
Facing Trouble Configuring SMTP Settings for Gmail? Get it fixed today!
So, that’s how you can send up to 500 emails per day for free from WordPress by using Gmail SMTP settings. You just have to use those SMTP settings for Gmail under the appropriate section, enter POP3 or IMAP server details to receive emails and you are all set to go. If you are still facing trouble configuring WordPress with a Gmail SMTP server, you must get in touch with Internet Homes email experts at a toll-free number.