If the Gmail POP3 settings are inappropriate, you won’t obtain any emails or messages. Therefore, you are always suggested to carefully configure your Gmail server settings for POP. Furthermore, you are also required to configure the email client to download your messages directly from the Gmail server. However, POP settings are needed to be organized in the correct form as you can then access incoming messages frequently. In this guide, we will show you the right way the configuration of Gmail server settings. Thus, give a glimpse to learn!
How To Enable POP in Gmail?
Before you begin to set up Pop3 Settings For Gmail, you are highly recommended to enable POP in Gmail first. Here’s how:
- First, open a Gmail account with the correct login credentials.
- Then, at the Gmail homepage, select the gear icon named Settings and then choose “See all Settings”.
- Afterward, in the “Settings” section, select the “Forwarding and POP/IMAP” tab.
- Now, go to the “POP Download” section. There, select “Enable POP for all mail” or “Enable POP for mail that arrives from now on”.
- After that, go to the “When messages are accessed with POP” option and click on its dropdown arrow. From the menu, select the option for what will happen when your Gmail messages are accessed via email client. You can select any of the below-listed options:
1. If you choose the option “keep Gmail’s copy in the Inbox”, then the deleted messages will still be available in the email client. You can see those messages when you open Gmail in a web browser.
2. If you choose the option “delete Gmail’s copy”, then a downloaded message will get deleted from Gmail. And also, you won’t access that message from the Gmail website.
- Once you make a selection depending on your choice, select “Save Changes”.
Make sure your system has a strong Internet Connection otherwise you can face several issues when you set up POP3 settings.
Follow Guidelines To Configure Gmail Pop3 Settings
To configure your email client with the Pop3 Gmail Settings, first, create a new account. The exact way to perform these steps is quite different for each email client. Here, we will show you the actual procedure to set up Gmail in Outlook. Let’s take a glance below:
- First, launch Outlook.
- Now, go to the “File” menu and select the “Info” tab.
- Now, navigate Account Settings > Account Settings.
- In the Account Settings dialog box, go to the “Email” tab and then click “New”.
- In the Add Account dialog box, enter your full name, complete Gmail address, and correct password. Outlook fills in the rest of the server details for you. If unluckily that doesn’t work, select “Manual setup” or additional server types. Then, press “Next”.
- Now, choose “POP” or “IMAP” and then click “Next”.
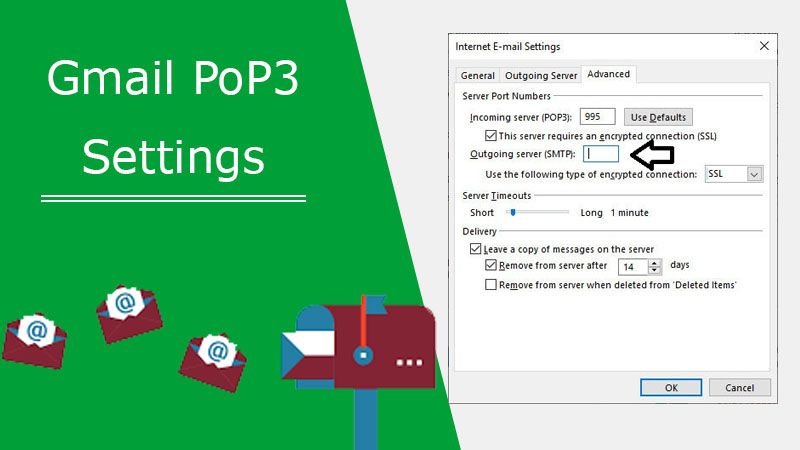
- Enter the following settings:
1. Gmail POP3 Host: pop.gmail.com
2. Gmail POP3 username: Your Gmail address (e.g. example@gmail.com)
3. Gmail POP3 password: Your Gmail password
4. Gmail POP3 port: 995
5. Gmail POP3 SSL required: yes
- Now, finally, click “Next” for further process.
- Outlook runs a test and informs you whether it’s able to download messages from Gmail.
- You will receive a message “Congratulations! All tests completed successfully”. Once you get such a statement on your “Test Account Settings” window, click the “Close” tab to continue.
If the messages are getting downloaded from Gmail on an Outlook account, then great! Gmail Pop3 Settings has been fruitfully configured. You are now flawlessly allowed to use your Outlook for receiving any emails from Gmail. It means you don’t need to log in to your Gmail account for getting any emails or messages. You can simply receive emails on the Outlook email client.
Some Basic Information For You
- With some email clients, it is necessary to enter POP3 and SMTP Settings on the same screen.
- If the email client can’t connect with Gmail, enable the “Less secure app access” setting in Google. To do so:
1. Go to your Google account home page.
2. Choose the “Security” tab.
3. Scroll down to the “Less secure app access” option, and follow the on-screen guide to enable this feature.
4. When you perform the above course of action, make sure that your Google account is more vulnerable to external access.
- If the email client won’t be able to connect to Gmail, enable SMTP authentication on the outgoing server.
Also Read: How to change default Gmail account?
Summing It
You are not the only person who is unable to configure Gmail Pop3 Settings even after implementing the aforementioned guidelines. Many candidates mostly confront technical glitches, so we are here to assist them. All you helpless people are required to do is place a single call at the Internet Homes helpline number. One of our top-most techies will surely lend you hand instantly.